
Infor CloudSuite Industrial (CSI) provides powerful reporting capabilities, often leveraging Dataviews for easy extraction of data. However, when dealing with CSI reports that do not have an associated Dataview, generating an Excel formatted report can be accomplished by using the Report Options Form.
Today we are going to use the Accounts Payable Aging Report as an example.
Report Options Form
First, lets talk about the available fields on the Report Options Form and how they are used to specify the options for our Accounts Payable Aging Report.
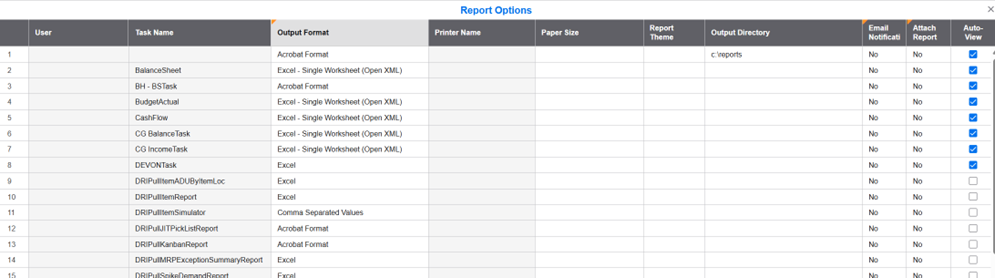
- User – This field specifies the user ID to whom these report options apply. Leave this field blank if they apply to all.
- Task Name – This field specifies the task to which these options apply. The options are available as a drop down.
- Some reports have more than 1 version. Our Accounts Payable Aging Report, for example, is listed as:
- AccountsPayableAgingReport
- AccountsPayableAgingReport2
- In our example we want AccoutnsPayableAgingReport2. There will be some trial and error to find the correct version of the report for your version of CSI.
- Some reports have more than 1 version. Our Accounts Payable Aging Report, for example, is listed as:
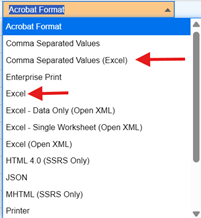
- Output Format – This Field specifies the output of the report being generated. The Excel options (non-HTML) are:
- Comma Separated Values (Excel) – These look like a dataview
- Printer Name – Leave this field blank. This option is available only if you select Printer as the Output Format.
- Paper Size – Leave this field blank. Not needed for the Excel formatted report.
- Report Theme – Leave this field blank. Not needed for the Excel formatted report.
- Output Directory – Leave this field blank. Not needed for the Excel formatted report. This is a combination of user, report, or device, you can specify an output directory for the reports.
- Email Notification – Select this checkbox if you want the user in the User field to be notified via email that the report in the Task Name field has ben printed. The prerequisites for this functionality are as follows:
- On the Intranets form, select the Send Email Notification field for the appropriate intranet.
- The appropriate intranet will be the default intranet. It is internal (External checkbox is not selected).
- On the Users or User Information form, verify that your email address is entered correctly.
- Email address should be filled in all 4 email fields in the User’s profile
- On the Intranets form, select the Send Email Notification field for the appropriate intranet.

- Attach Report – Select this checkbox if you want to send yourself a copy of the report as an email attachment. This option is only available if the Email Notification checkbox is selected.
- Auto-View – Select this checkbox.
Report with the Comma Separated Value (Excel) Output Format
- Open the Accounts Payable Aging Report
- After Inputting your filter criteria click the Preview button
- This will always generate as a PDF as this format is determined by the inputs on the intranets form under the reporting tab.
- When ready click the Print Button
- The report will open another tab on your internet and it will seem it is loading another pdf version of the report. It is building the Excel File. Once Ready this file will pop up on your downloads icon in the upper right corner as shown below.
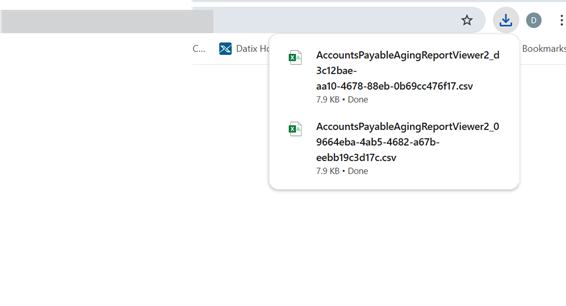
- Click the file to open.
- You will also receive an email with the Excel report attached.

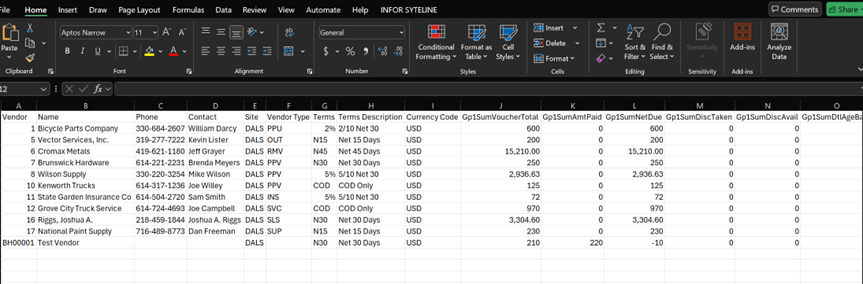
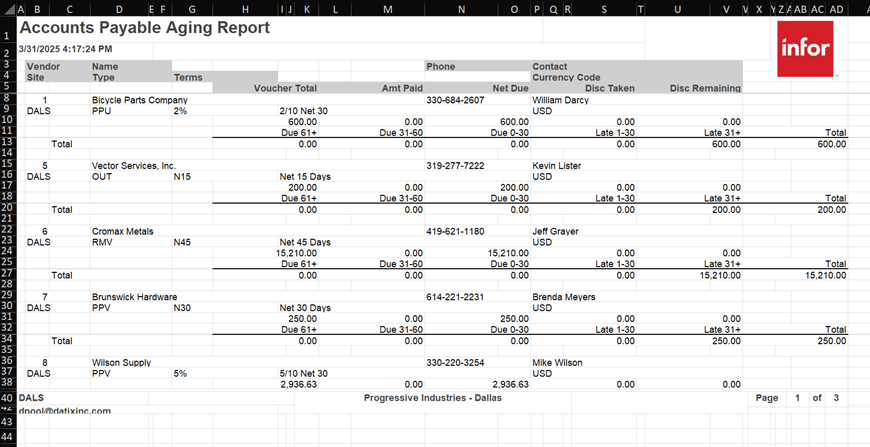
Report with the Excel Output Format
- Steps are the same as above, however, the output looks very different. Below is a snapshot of the report.
Final Thoughts
The Report Options form is a great tool for managing report outputs and getting your reports with the data you need without having to create a separate dataview. Be sure to always test and validate.