 SQL Server Reporting Services (SSRS) is a Microsoft-based reporting platform that is currently integrated into Epicor® version 10. Our clients have often needed to modify an out of the box report to suit one of their many business requirements. Naturally, we’ve become pretty familiar with the process of modifying SSRS reports in Epicor®. Here, we’ve gotten the Datix Epicor® consulting experts to show you how to modify an out of the box SSRS Report for yourself, no matter the complexity of the report.
(SSRS Report – code at bottom of page)
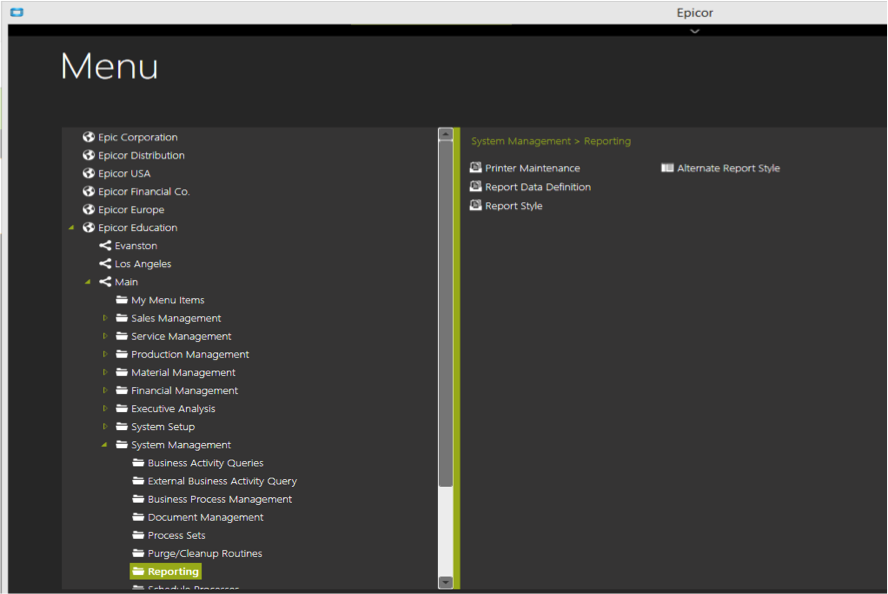
- Load Epicor®. Click on the System Management> Reporting> Report Data Definition.
- Click the “Code” button to search for the report you are modifying:
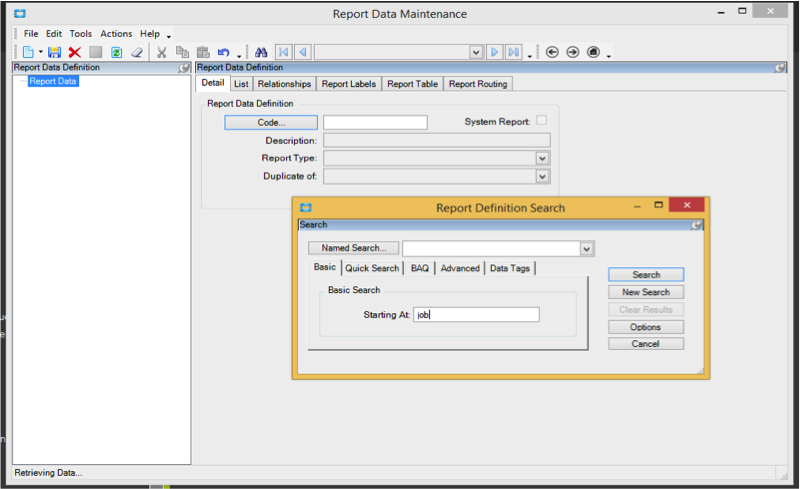
3. Click Actions> Duplicate Report.
4. The left side bar will display a cascading tree. Right click on Report Table and Add New Table.
5. Name it and add a Description.
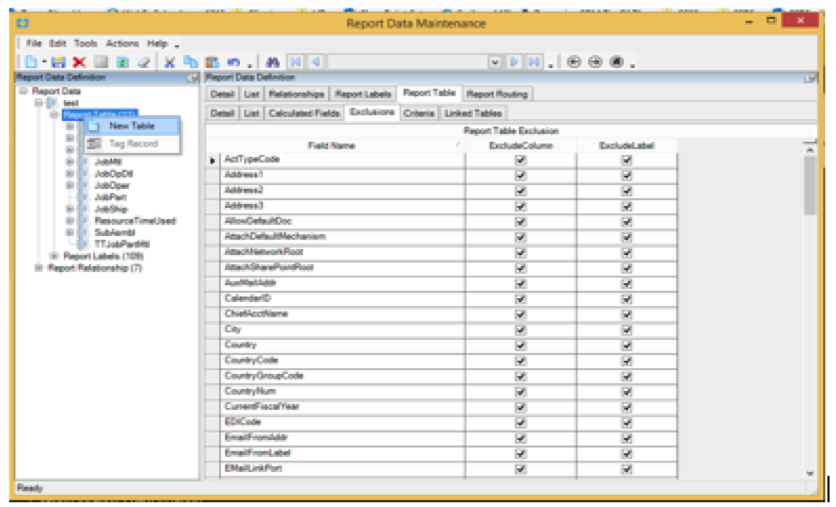
- Click Schema Table and search for the table you want to add.
- Double click to add, then add a sequence number (optional) to change the order of the table in the list
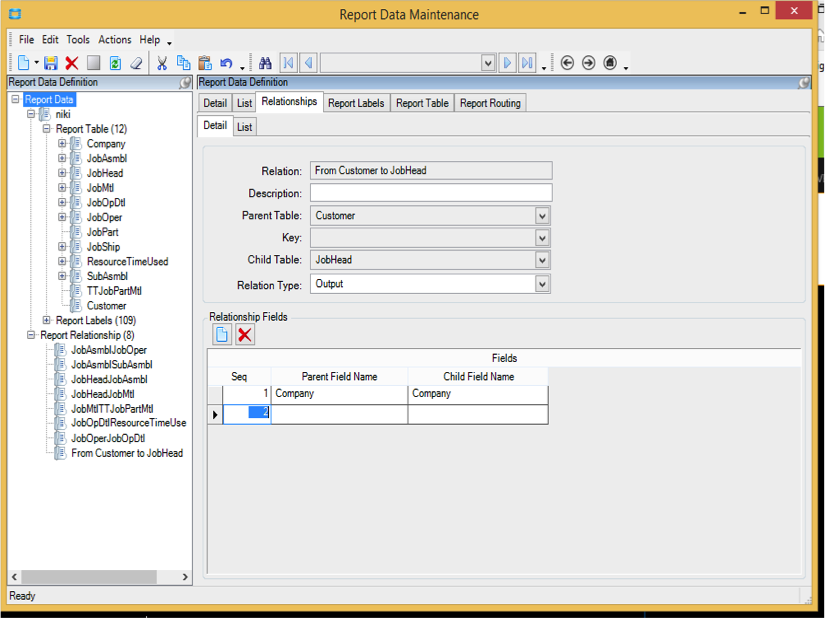
6. Add Table Relationship.
- Right click Report Relationship in the tree on the left and add new
- Change description from this table to that that table>
- Do not choose a key>
- Child table>
- Choose: Output (definition only will not output anything)>
- Add relationship fields.
- The field must always show the company and the field linking them together (i.e., part number).
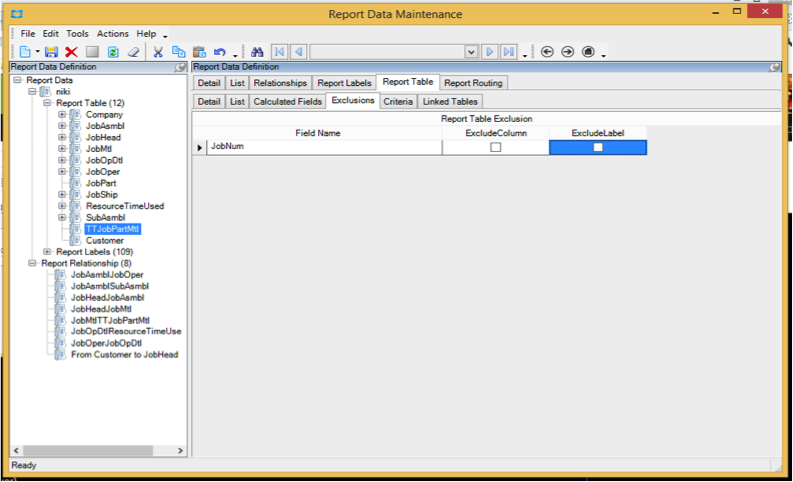
 7. After adding the relationships, click on the table in the tree on the left. Click the Report Table, then Exclusions tabs to “un-exclude” or include the fields from the tables needing to be included:
 8. Save and close this window.
9. Choose Report Style
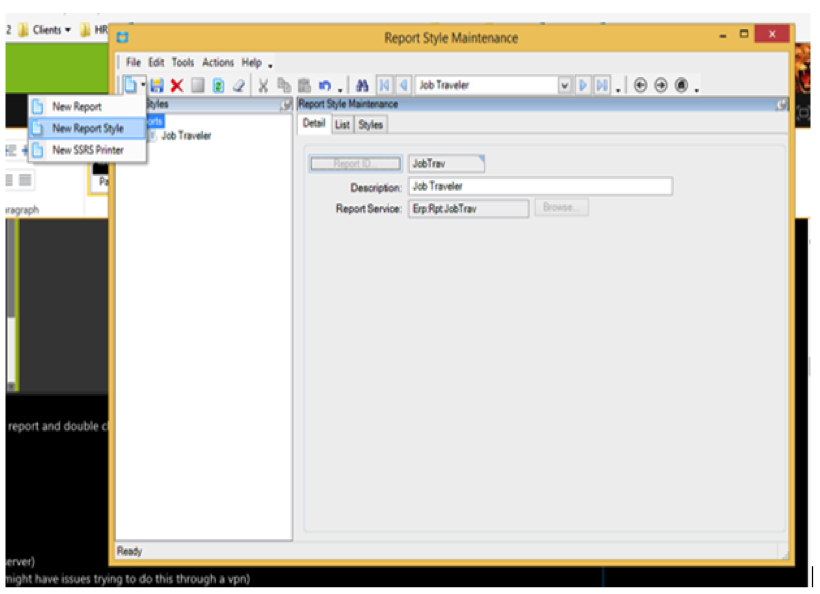
10. Click the Report ID button to search for your report and double click to open.
11. Click the new icon and choose New Report Style> Style Detail:
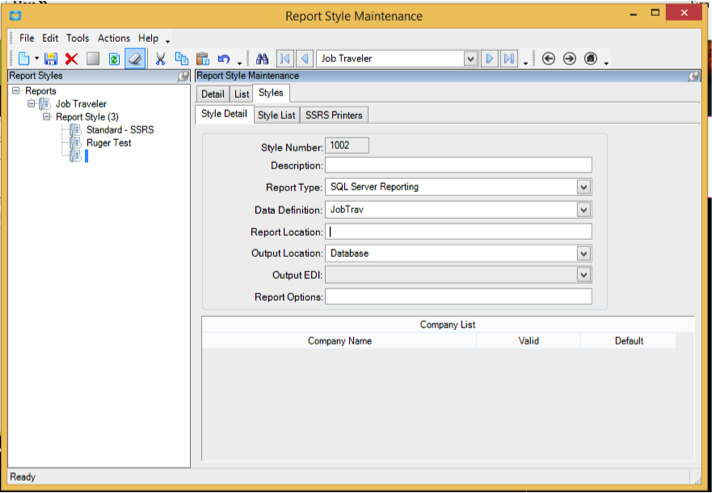
12. Fill in the following fields:
- Description (This is what users will see).
- Type: SQL Server Reporting
- Choose the data definition (i.e. Job Traveler)
- Report location. (This is a path to the report.)
- Output: Database
13. Navigate to the Report Manager URL
- SQL Servername/Reports (Not the application server)>
- Windows authentication enables (User may have issues trying to do this through a VPN)>
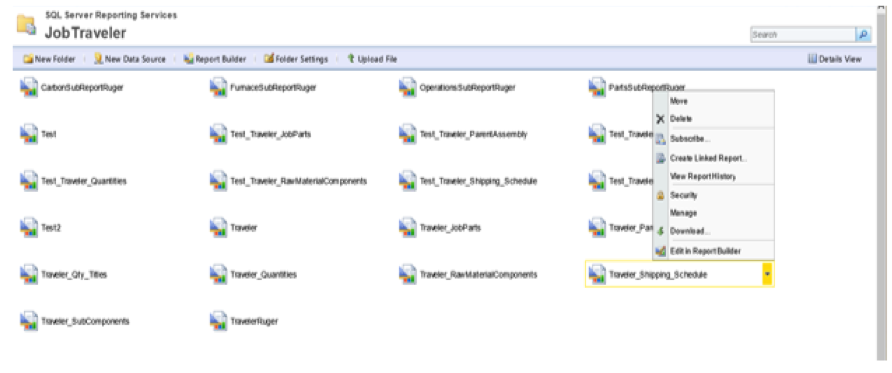
- Choose Main Report> Click Down Arrow to Right of Report> Edit in Report Builder
14. Make a copy of the Main Report> Save As
- Save it to the custom reports folder.
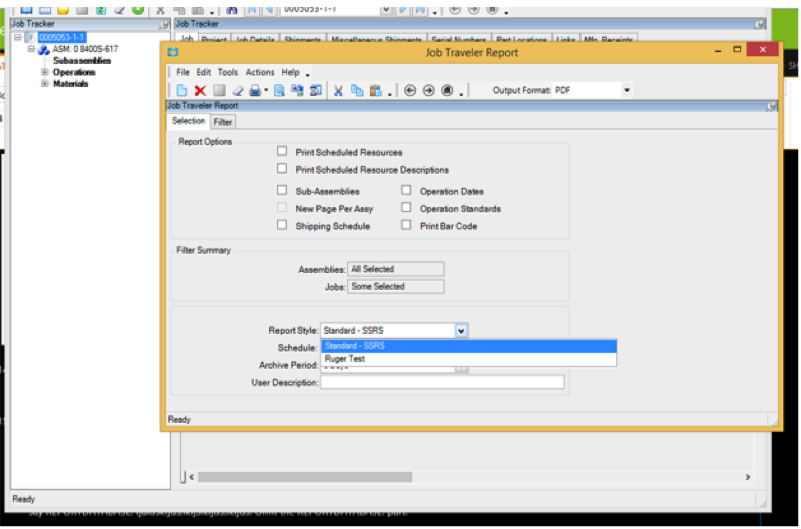
15. Run the Report in Epicor®.
- Make sure to select the report style.
- Click the Print Preview icon located at the top of the screen.
16. Retrieve the GUID from the System Monitor located on the bottom right of the screen. Double click to open.
- The GUID is the last field on the reports tab under filename and will say REPORTDATABASE: fjaldskfjds;lkfjslkfjds;lkfjds
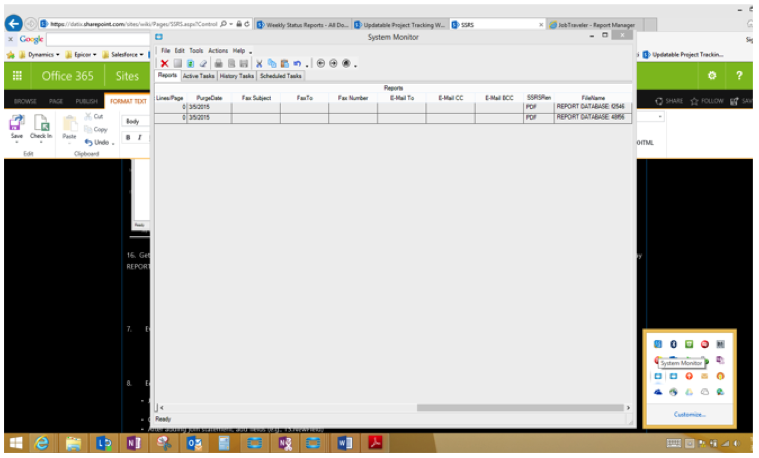
- Copy the contents of the field and paste somewhere to save it. Omit “REPORTDATABASE,” to simply save the GUID number.
17. Go back to Report Builder: Datasets> Right Click on Report Labels>Dataset Properties.
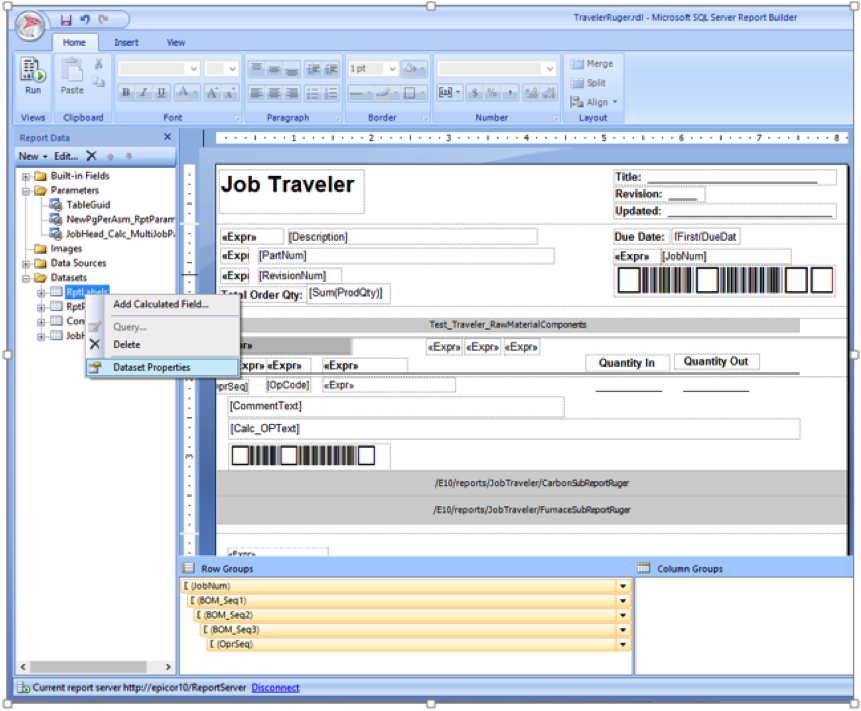
- Use dataset embedded in form.
- Click on the fx (functions) button.
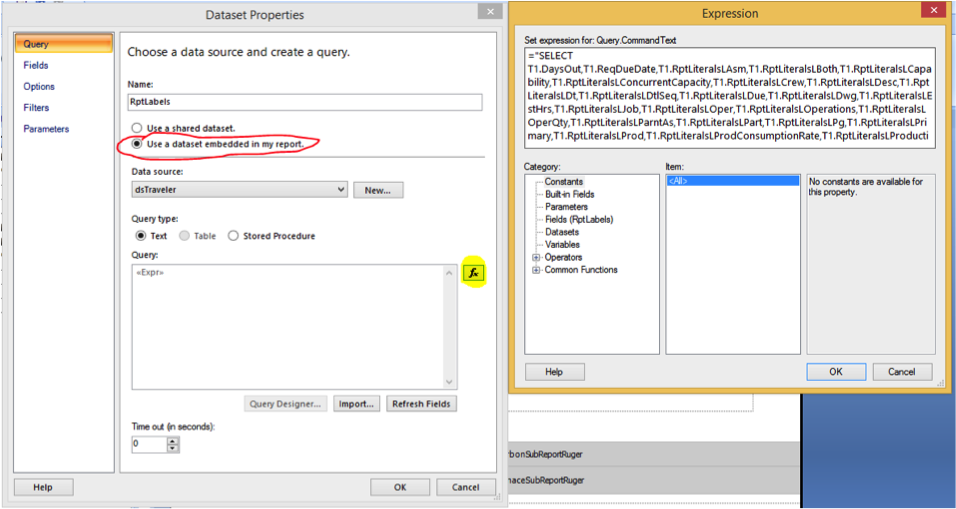
18. Edit the Query:
- Join on company and company: Po Num and Po Num
- Below is the table the user is joining and the fields the user is joining on.
- Copy from LEFT OUTER JOIN; right before next LEFT OUTER JOIN statement (see below example).
- After adding the join-statement, add fields (i.e. T5.NewField).
Example (Code):
Original Query
="SELECT
T1.RptLanguageID,
T1.CommentText,
T1.Company,
T1.FOB,
T1.FreightPP,
T1.OrderDate,
T1.PONum,
T1.PrintAs,
T1.ShipToConName,
T1.ShipViaCode,
T1.Calc_AccountRef,
T1.Calc_BillToAddrList,
T1.Calc_Buyer,
T1.Calc_CurDesc,
T1.Calc_CurSymb,
CAST(T1.Calc_ExistingDropShipReleases AS nvarchar) AS Calc_ExistingDropShipReleases,
T1.Calc_FOBDesc,
CAST(T1.Calc_MultiShiptoAddresses AS nvarchar) AS Calc_MultiShiptoAddresses,
T1.Calc_PurTerms,
T1.Calc_ShipToAddrList,
T1.Calc_ShipVia,
T1.Calc_VendorContact,
T1.Calc_VendPhone,
T1.Calc_VendFax,
T1.Calc_EMail,
T1.BuyerID_EMailAddress,
T1.Vendor_EMailAddress,
T1.Vendor_FaxNum,
T1.VendorCnt_EmailAddress,
T1.Calc_TotDocMiscAmt,
T1.VendorCnt_FaxNum,
T2.CommentText AS PODetail_CommentText,
T2.Company AS PODetail_Company,
T2.DocUnitCost,
T2.MfgPartNum,
T2.MfgPartOpts,
T2.PartNum,
T2.POLine,
T2.PONUM AS PODetail_PONum,
T2.PUM,
T2.RevisionNum,
T2.SubPartNum,
T2.SubPartOpts,
T2.SubPartType,
T2.Taxable,
T2.VendorPartOpts,
T2.VenPartNum,
T2.Calc_CostPer,
T2.Calc_DtLineDesc,
T2.Calc_ExtCost,
T2.Calc_UOMDescription,
T2.Calc_MfgID,
T3.[Description],
T3.DocMiscAmt,
T3.POLine AS POMisc_POLine,
T3.PONum AS POMisc_PONum,
T3.Taxable AS POMisc_Taxable,
T4.Calc_AccountRef AS RptLiteralsCalc_AccountRef,
T4.RptLiteralsLFax,
T4.FreightPP AS RptLiteralsFreightPP,
T4.RptLiteralsLAuthBy,
T4.RptLiteralsLChangeOrder,
T4.RptLiteralsLClosed,
T4.RptLiteralsLDueDt,
T4.RptLiteralsLExtPrice,
T4.RptLiteralsLFOB,
T4.RptLiteralsLHdng,
T4.RptLiteralsLJobNum,
T4.RptLiteralsLLine,
T4.RptLiteralsLLineChargeSubtotal,
T4.RptLiteralsLMfgPartNumber,
T4.RptLiteralsLMiscChargeSubtotal,
T4.RptLiteralsLMslshS,
T4.RptLiteralsLOrderDate,
T4.RptLiteralsLOrderQty,
T4.RptLiteralsLOurPartNumber,
T4.RptLiteralsLPg,
T4.RptLiteralsLPhone,
T4.RptLiteralsLPONum,
T4.RptLiteralsLPrtRvDes,
T4.RptLiteralsLQty,
T4.RptLiteralsLResalNo,
T4.RptLiteralsLRevised,
T4.RptLiteralsLSeeBelow,
T4.RptLiteralsLSeq,
T4.RptLiteralsLShipTo,
T4.RptLiteralsLShipVia,
T4.RptLiteralsLShRelReq,
T4.RptLiteralsLSubstitute,
T4.RptLiteralsLSubstitutedFor,
T4.RptLiteralsLSupplierPartNumber,
T4.RptLiteralsLTax,
T4.RptLiteralsLTerms,
T4.RptLiteralsLTotal,
T4.RptLiteralsLUnitPric,
T4.RptLiteralsLVend,
T4.RptLiteralsLLnMsChrg,
T4.RptLiteralsLDesc,
T4.PONum AS RptLiteralsPONum,
T4.RptLiteralsLAmt
 FROM POHeader_" + Parameters!TableGuid.Value + " T1
 LEFT OUTER JOIN PODetail_" + Parameters!TableGuid.Value + " T2
ON T1.Company = T2.Company AND T1.PONum = T2.PONUM
 LEFT OUTER JOIN POMisc_" + Parameters!TableGuid.Value + " T3
ON T1.Company = T3.Company AND T1.PONum = T3.PONum
 LEFT OUTER JOIN RptLabels_" + Parameters!TableGuid.Value + " T4
ON T1.RptLanguageID = T4.RptLanguageID"
New Query
New Query
="SELECT
T1.RptLanguageID,
T1.CommentText,
T1.Company,
T1.FOB,
T1.FreightPP,
T1.OrderDate,
T1.PONum,
T1.PrintAs,
T1.ShipToConName,
T1.ShipViaCode,
T1.Calc_AccountRef,
T1.Calc_BillToAddrList,
T1.Calc_Buyer,
T1.Calc_CurDesc,
T1.Calc_CurSymb,
CAST(T1.Calc_ExistingDropShipReleases AS nvarchar) AS Calc_ExistingDropShipReleases,
T1.Calc_FOBDesc,
CAST(T1.Calc_MultiShiptoAddresses AS nvarchar) AS Calc_MultiShiptoAddresses,
T1.Calc_PurTerms,
T1.Calc_ShipToAddrList,
T1.Calc_ShipVia,
T1.Calc_VendorContact,
T1.Calc_VendPhone,
T1.Calc_VendFax,
T1.Calc_EMail,
T1.BuyerID_EMailAddress,
T1.Vendor_EMailAddress,
T1.Vendor_FaxNum,
T1.VendorCnt_EmailAddress,
T1.Calc_TotDocMiscAmt,
T1.VendorCnt_FaxNum,
T2.CommentText AS PODetail_CommentText,
T2.Company AS PODetail_Company,
T2.DocUnitCost,
T2.MfgPartNum,
T2.MfgPartOpts,
T2.PartNum,
T2.POLine,
T2.PONUM AS PODetail_PONum,
T2.PUM,
T2.RevisionNum,
T2.SubPartNum,
T2.SubPartOpts,
T2.SubPartType,
T2.Taxable,
T2.VendorPartOpts,
T2.VenPartNum,
T2.Calc_CostPer,
T2.Calc_DtLineDesc,
T2.Calc_ExtCost,
T2.Calc_UOMDescription,
T2.Calc_MfgID,
T3.[Description],
T3.DocMiscAmt,
T3.POLine AS POMisc_POLine,
T3.PONum AS POMisc_PONum,
T3.Taxable AS POMisc_Taxable,
T4.Calc_AccountRef AS RptLiteralsCalc_AccountRef,
T4.RptLiteralsLFax,
T4.FreightPP AS RptLiteralsFreightPP,
T4.RptLiteralsLAuthBy,
T4.RptLiteralsLChangeOrder,
T4.RptLiteralsLClosed,
T4.RptLiteralsLDueDt,
T4.RptLiteralsLExtPrice,
T4.RptLiteralsLFOB,
T4.RptLiteralsLHdng,
T4.RptLiteralsLJobNum,
T4.RptLiteralsLLine,
T4.RptLiteralsLLineChargeSubtotal,
T4.RptLiteralsLMfgPartNumber,
T4.RptLiteralsLMiscChargeSubtotal,
T4.RptLiteralsLMslshS,
T4.RptLiteralsLOrderDate,
T4.RptLiteralsLOrderQty,
T4.RptLiteralsLOurPartNumber,
T4.RptLiteralsLPg,
T4.RptLiteralsLPhone,
T4.RptLiteralsLPONum,
T4.RptLiteralsLPrtRvDes,
T4.RptLiteralsLQty,
T4.RptLiteralsLResalNo,
T4.RptLiteralsLRevised,
T4.RptLiteralsLSeeBelow,
T4.RptLiteralsLSeq,
T4.RptLiteralsLShipTo,
T4.RptLiteralsLShipVia,
T4.RptLiteralsLShRelReq,
T4.RptLiteralsLSubstitute,
T4.RptLiteralsLSubstitutedFor,
T4.RptLiteralsLSupplierPartNumber,
T4.RptLiteralsLTax,
T4.RptLiteralsLTerms,
T4.RptLiteralsLTotal,
T4.RptLiteralsLUnitPric,
T4.RptLiteralsLVend,
T4.RptLiteralsLLnMsChrg,
T4.RptLiteralsLDesc,
T4.PONum AS RptLiteralsPONum,
T4.RptLiteralsLAmt
T5.PartNum
 FROM POHeader_" + Parameters!TableGuid.Value + " T1
 LEFT OUTER JOIN PODetail_" + Parameters!TableGuid.Value + " T2
ON T1.Company = T2.Company AND T1.PONum = T2.PONUM
 LEFT OUTER JOIN POMisc_" + Parameters!TableGuid.Value + " T3
ON T1.Company = T3.Company AND T1.PONum = T3.PONum
 LEFT OUTER JOIN Part_" + Parameters!TableGuid.Value + " T5
ON T2.Company = T5.Company AND T2.PartNum = T5.PartNum
 LEFT OUTER JOIN RptLabels_" + Parameters!TableGuid.Value + " T4
ON T1.RptLanguageID = T4.RptLanguageID"
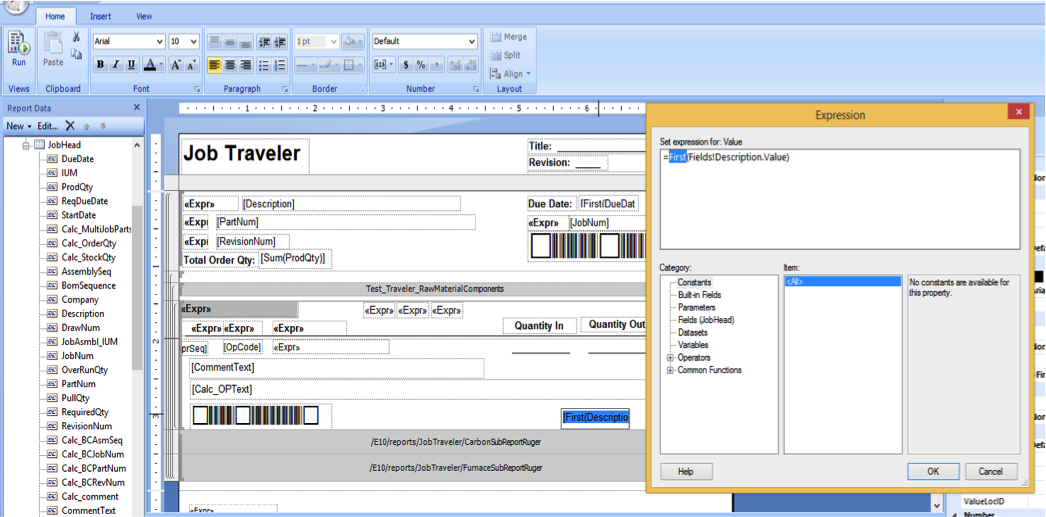
19. Add Field
- Add Query Field> Name and Source Field
- Run to Check Syntax Error
- Add Field to Form
- Get rid of the word “first,” if user is dragging and dropping.
20. Run the report with your saved GUID by right clicking on Parameters in the tree on the left of the screen and Add Parameter:
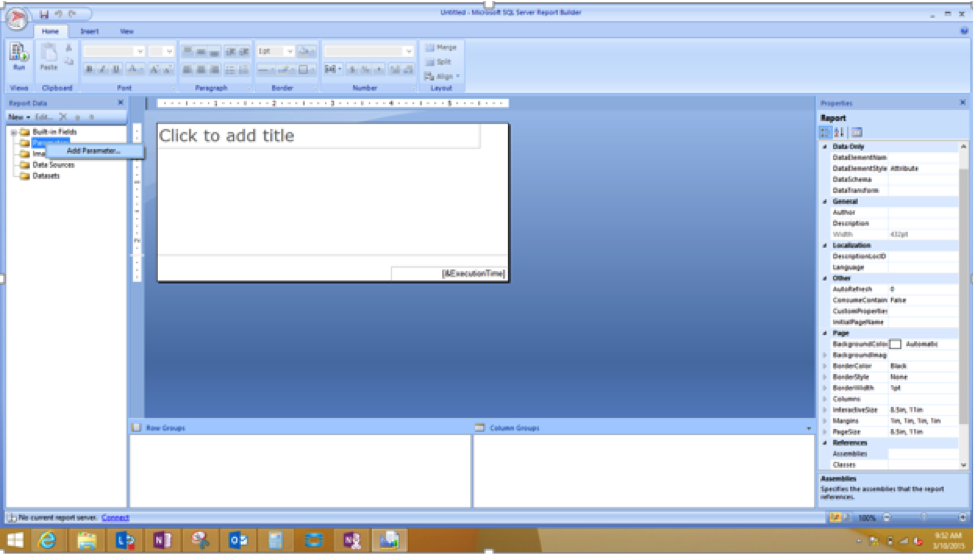
21. Click Default Values> Specify Values and paste the GUID from earlier into the expression box.
The user has successfully modified an out of the box SSRS report!
For More Help…
We hope this tutorial was helpful. Our experts specialize in helping Epicor® users get the most out of their software by molding the technology to fit best practices and proper business processes for each organization we work with (such as an Epicor® Salesforce integration or Epicor® Dynamics 365 integration). If you’d like more help with Epicor® 10 reports, please contact us today! Datix knows ERP inside and out.