Epicor® ERP Data Validation
As I mentioned in my previous blog about using Epicor®’s Data Management Tool (DMT), Epicor® is built upon a hierarchical set of tables. For those of you those managing uploads, troubleshooting data errors, or validating data after an upload, there is a lot of value in being able to view this data in MS SQL. For this tech tip, I will show you some very simple queries that will allow you to view your data in different ways.
A warning: Changing data in MS SQL from your instance(s) of Epicor®, such as editing, updating, or deleting can corrupt your database and/or delete data. This will void your Epicor® warranty. I strongly suggest that only trustworthy and responsible employees be given access to the Microsoft SQL server and you only use it to view existing data. The statements below only view data and do not change anything.
Setup
Before we begin, if you intend to follow along and try out these queries, make sure you have the necessary database selected in the dropdown located in the top left hand corner of your screen as shown below. 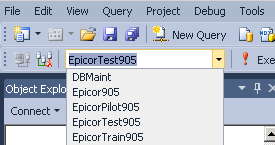
I am using a temp table instead of a database table, so the table name part of the query will be slightly different for you.
My statement shows “Select * from #temptest” where you would use “Select * from dbo.TableName.”
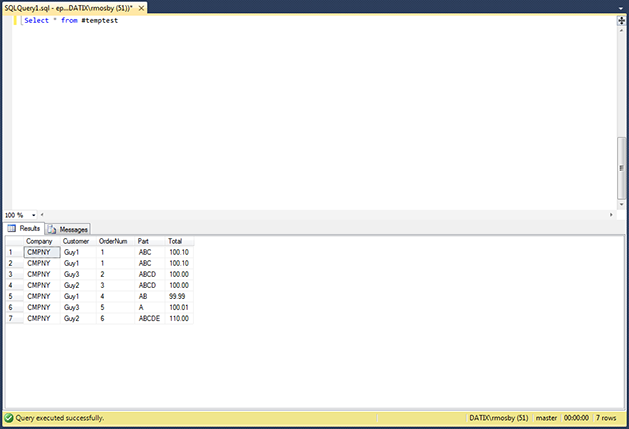
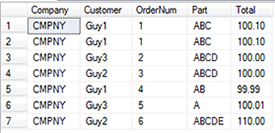 For the sake of illustration, I have created a small table containing 7 rows, 1 company, 3 different customers, 6 order numbers, 5 parts, and 5 different totals.
Running the queries
Query 1. Select * from dbo.TableName;
This query will return the entire table you have specified. This is good when you want to know how many rows exist, view an entire table at a high level, get field names from the table, or make sure your data is being loaded into the appropriate fields. This is a very high level review statement that will not segment data into easy to read chunks by itself.
Example where this is useful:
You might be moving Customer data from an old system into Epicor® for a new implementation and you want to make sure all of your data was successfully uploaded. Each line is an independent record, so the number of rows should match the number of records in most cases. So by running the above query, you can compare the number of Customer rows to the number of Customer records you intended to upload for easy validation. I recommend diving deeper for validation using other methods and queries, but at a high level this is an easy quick check.
Query 2. Select distinct * from dbo.TableName;
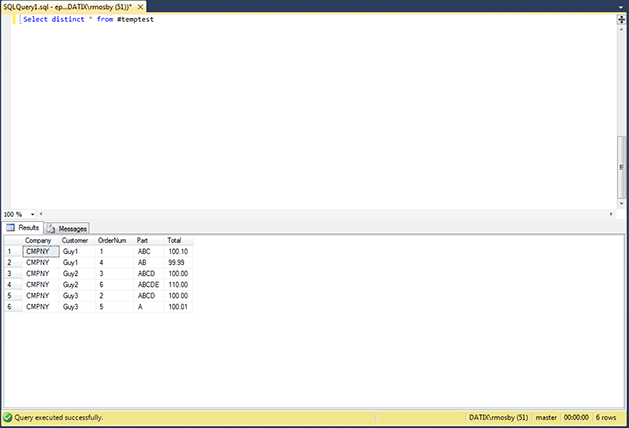
All results for this query are unique. To explain, if there are any lines that have copies or duplicates of the exact same data, only one will be shown. In the full table, notice that lines 1 & 2 are the exact same. When we select distinct, only 6 rows are returned with only a single copy of line 1 or 2. By doing “Select distinct” you are excluding any duplicates from your returned data.
Example where this is useful:
This can be useful for evaluating old data, creating tables for new data uploads into Epicor®, and validating data that has been uploaded. If you are looking at data that may contain duplicates and you only want to see unique rows, this will only return 1 line instead of multiple where there are copies of rows. Epicor® data validation made easy!
Query 3. Select FieldName from dbo.TableName;
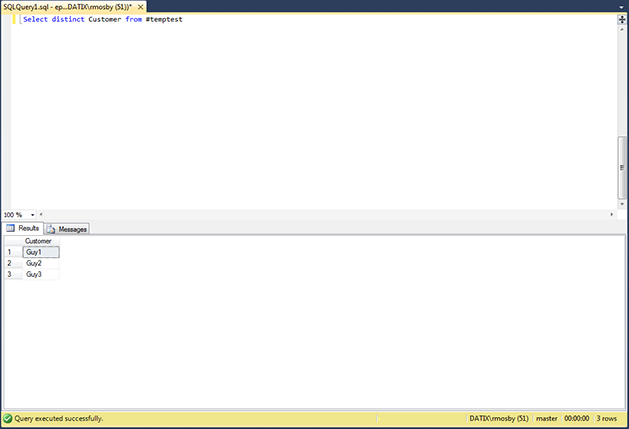
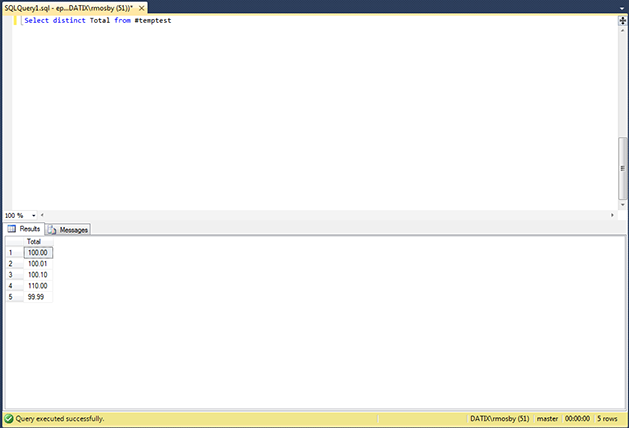
This query will return all cells contained in the specified field. You may also use
"Select Distinct FieldName from dbo.TableName;"
to see all different entries uploaded into this field, meaning that it returns each combination of fields in unique lines.
Example where this is useful:
This can be powerful when evaluating old data, creating tables for new data uploads into Epicor®, or data validation. For example, say you have old data that is recorded into five different categories, but you’re consolidating into three categories moving forward. If you tried to upload a category that is not one of the existing three, you would receive an error. You can use
"Select distinct FieldName from dbo.TableName;"
and see if there are more than three different kinds of entries in a certain field.
Query 4. Select * from dbo.TableName where ColumnName = ‘VALUE’;
This query lets you drill down into your data to find more specific pieces of information. You must use single quotes around the specific value that you want to find. You may use multiple operators such as <, >, =, !=, and more. (less than, greater than, is equal to, is not equal to, etc.)
Example where this is useful:
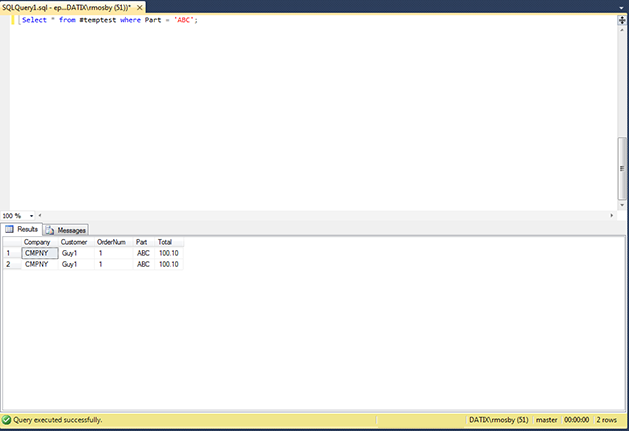
Say you want to find all orders with a specific part number and return the full row for each result. We would type
"Select * from dbo.TableName where Part = 'ABC';"
and get the following.
Example two:
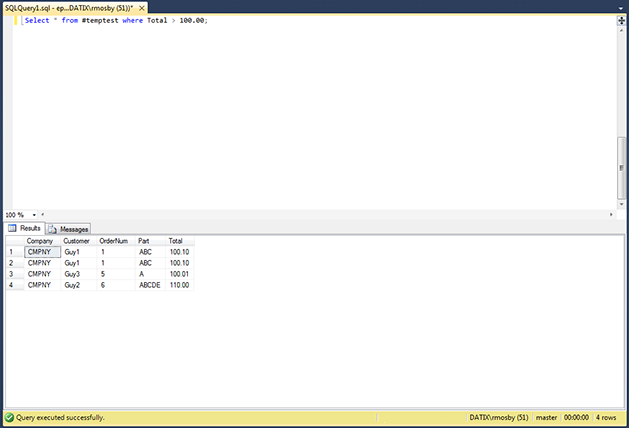
Say you wanted to see all orders over $100.00. (Notice you do not use any single quotes when referring to numbers within the where condition.)
"Select * from dbo.TableName where Total > 100.00;"
Example three: If you want to find a row or cell that contains a certain attribute you can use a “like” in your where statement.
"Select * from dbo.TableName where Part like '%ABCD%';"
– All rows that contain the string “ABCD” anywhere in the part field will be returned.
Query 5.Tying it all together including “and” and “or”
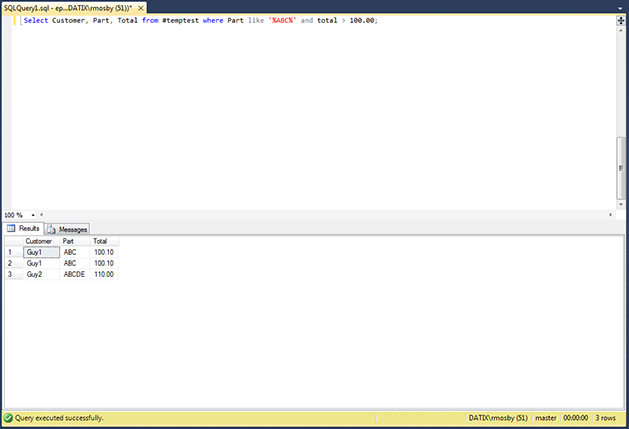
You can combine different pieces of these queries to find very specific data or creating where statements to have multiple conditions containing “and” and “or”. You can also select multiple fields from the table to be returned as opposed to selecting * or selecting only 1 field by using a comma – “Select Customer, Part, Total from dbo.TableName”
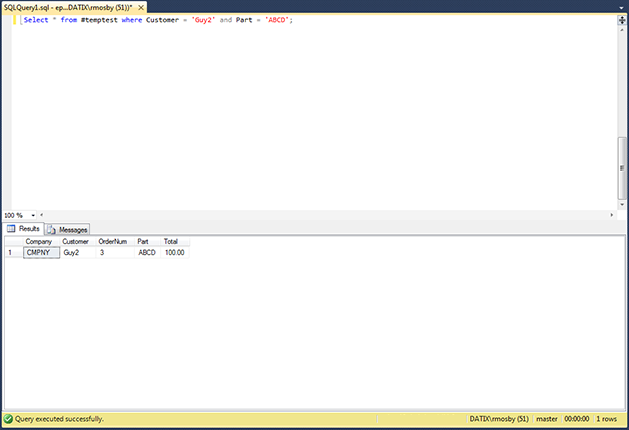
For example:
"Select * from dbo.TableName where Customer = 'Guy2' and Part ='ABCD'
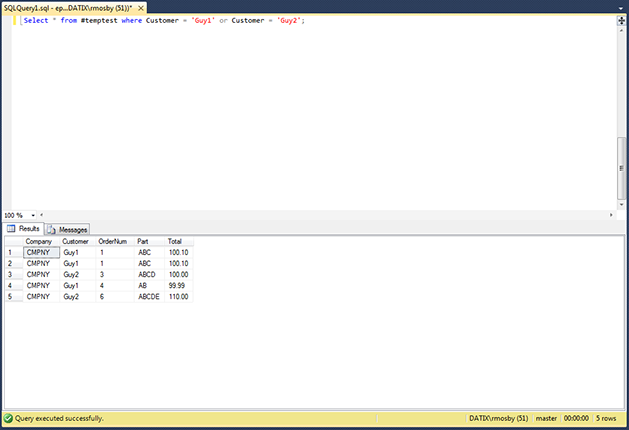
Example two:
"Select * from dbo.TableName where Customer = 'Guy1' or Customer = 'Guy2';
Example three:
"Select Customer,Part,Total from dbo.TableName
      where Part like '%ABC%'
      and Total > 100.00;"
What do you think, did this help with Epicor® data validation?
Was this helpful? What has been your experience working with Epicor® data in MS SQL?
Suggested:
- Read our blog post on uploading data using Epicor® DMT
- Learn more about Epicor® ERP services


